
Motivation:
Yes, we have GUI now days, I love them and use them too, but there are times where you are working on a team in a real world and need to write some lines. It's better if we learn just a couple of them or at least have them handy.
Git Merge
How do we merge the master branch into the feature branch? Easy:
git checkout feature1
git merge master
Show settings
git config --global -l
Add your information
git  config --global user.name 'myUser'
git  config --global user.email 'myEmail'
Compatibility (This allows multi OS team collaboration)
git config --global core.autocrlf true
Generate SSH Key
ssh-keygen -t rsa -b 4096 -C "githubEmail"

# Mac exaxmple location:
cat /Users/Arturo/.ssh/id_rsa.pub
# Windows example location:
# `/h//.ssh/id_rsa`
Working with Git
Gitignore
# Create a global gitignore:
touch ~/.gitignore_global
# Add it to the configuration
git config --global core.excludesfile ~/.gitignore_global
# Make all the patterns ignored in all situations.
~/.gitignore_global

# Examples:
# Ignore the node_modules directory
node_modules/

# Ignore Logs
logs
*.log

# Ignore the build directory
/dist

# The file containing environment variables
.env

# Ignore IDE specific files
.idea/
.vscode/
*.sw*
# In some cases, some files will still appear eventhough they are on the gitignore because it only works for untracked files.
# If you added files to repository, you can:
git update-index --assume-unchanged <file>
# or remove them from repository by:
git rm --cached <file>
Checkout
# (Local)
git checkout branchName
# (Remote)
git checkout --track origin/branchName
Discard ALL changes (you cannot undo this)
git checkout -f
# Or
git checkout HEAD^
git checkout -f master
Shows commit history
# (command line)
git log --graph --oneline -- decorate --all
# (graphical)
gitk --all
Renaming and Deleting
# Remove file
git rm file1
# Renames file
git mv file1 file2
# Search in repo for a specific file and delete it
find . -name .DS_Store -print0 | xargs -0 git rm -f --ignore-unmatch
Cloning a branch
- List configured remotes of the new clone:
git remote -v - There are two good ways to switch branches (I prefer #1):
git checkout --track origin/abranchwill only create 'abranch', not a branch with a different name.
git checkout -b mybranch origin/abranchwill create 'mybranch' and track origin/abranch
Pulling changes
- Do a pull request from the main branch to yours
git stashStash your changes so that you can pull the new onesgit pullgit stash popput your files modified back
How to collaborate on a project and submit pull requests:
# 1. Clone the desired repo.
# --------------------------
# 2. List configured remotes of the new clone:
git remote -v
# 3. Add upstream to the desired repo that you cloned:
git remote add upstream https://githubURL
# 4. Fetch the branches and their respective commits from the upstream repository.
# (Commits to master will be stored in a local branch, upstream/master.)
git fetch upstream
# 5. Check out your fork's local master branch.
git checkout master

# I suggest that every morning before working on your project you switch to master and do a:
git pull upstream master

# Create pull request:
# --------------------

# Terminal walkthrough:
# On the terminal (make sure you are on your branch) go to the path of your forked repo and type:
git status
# that will allow you to see what's been changed on your current branch.
# You can select the files you'd like to stage by typing (for this example I'll use README.md as the file we want to commit):
# This stages the file
git add README.md
# This commits the files added with a message
git commit -m "Added FileUploader versioning"
git push origin nameOfYourBranch
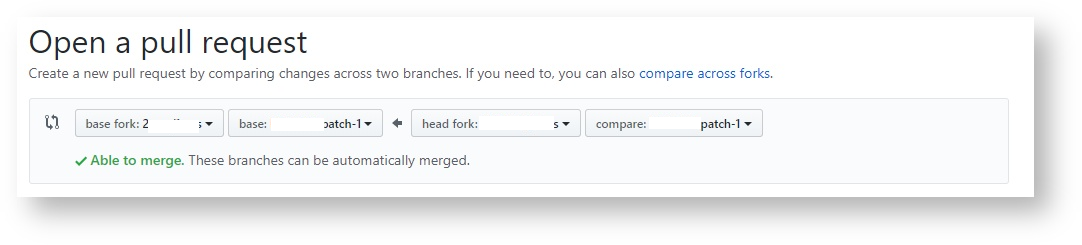
Now go to your forked repo on github (Web) and on the right corner click on Pull Request, you are going to see your commited changes. You will see an image like the one below (by default if the same branch exists on the origin, it will autopopulate, if it doesn't, then you can select it) which means that tab#1 is the origin repo, tab#2 is where you are going to request the merge, tab#3 is your forked repo and tab#4 from where you are pushing.
Change default core editor
# Mac and Linux:
git config --global core.editor "subl -n -w"
# Windows:
git config --global core.editor "'c:/program files/sublime text 3/subl.exe' -w"

# To edit a file simply add --edit, example:
`git config --global --edit`
My fill .gitconfig:
[user]
        name = Arturo
        email = [email protected]
[core]
        editor = code
[filter "lfs"]
        clean = git-lfs clean -- %f
        smudge = git-lfs smudge -- %f
        process = git-lfs filter-process
        required = true

[diff]
    tool = vscode
[difftool "vscode"]
    cmd = code --wait --diff $LOCAL $REMOTE

[merge]
    tool = vscode
[mergetool "vscode"]
    cmd = code --wait $MERGED