
Secure your sensitive information with ease using Hashicorp Vault. Follow this step-by-step guide to set up the ultimate Secret Manager.
I will not go over the setup of an AWS instance here, you need to create a server first and then you can read how to do the basic configurations here. I'm going to be using an EC2 instance of Ubuntu 18.04.
The reason why I chose Hashicorp is because it's:
- Open source & free
- Secure
- Has a lot of options in terms of managing the organization
- Integrates well with all CI & backends.
Hashicorp Install
Assuming you have your server up an running already, let's install Hashicorp.
Add PGP for the package signing key:
sudo apt update && sudo apt install gpgInstall Hashicorp
wget -O- https://apt.releases.hashicorp.com/gpg | gpg --dearmor | sudo tee /usr/share/keyrings/hashicorp-archive-keyring.gpg
echo "deb [signed-by=/usr/share/keyrings/hashicorp-archive-keyring.gpg] https://apt.releases.hashicorp.com $(lsb_release -cs) main" | sudo tee /etc/apt/sources.list.d/hashicorp.list
sudo apt update && sudo apt install vault
Start the service
sudo systemctl start vaultTroubleshooting
Check if the service has started
sudo systemctl status vaultCheck if the Vault server is listening on the correct address and port
sudo netstat -tulpn | grep 8200If the previous step does not work, make sure that the firewall or security group is not blocking the traffic to the Vault server on port 8200.
If you are still facing the same issue, you may have to check the Vault logs for further information:
sudo journalctl -u vaultService restart
Will the service restart automatically if the EC2 instance restarts?
Yes, if you have enabled the Vault service using sudo systemctl enable vault, it will start automatically when the server is restarted. The systemctl enable command creates a symlink from the Vault service file to the /etc/systemd/system/multi-user.target.wants/ directory, which means that the Vault service will be started automatically as part of the system boot process.
You can verify this by checking the status of the Vault service after a restart:
sudo systemctl status vaultSetting up the Service
Check the location of your vault with which vault and make sure the value ExecStart on the file below reflects that.
Create a Vault service file:
sudo vim /etc/systemd/system/vault.serviceCopy the following inside the file:
[Unit]
Description="HashiCorp Vault - A tool for managing secrets"
Documentation=https://www.vaultproject.io/docs/
Requires=network-online.target
After=network-online.target

[Service]
User=root
Group=root
PIDFile=/var/run/vault/vault.pid
ExecStart=/usr/bin/vault server -config /etc/vault/config.hcl
ExecReload=/bin/kill -HUP $MAINPID
KillSignal=SIGINT
TimeoutStopSec=5
SendSIGKILL=no

[Install]
WantedBy=multi-user.target
Create a new certificate and private key for Vault:
Note the amount of days you want the certificate to expire on the flag -days below:
sudo openssl req -newkey rsa:4096 -nodes -keyout vault.key -x509 -days 6650 -out vault.crtMove the certificate and private key to the appropriate location:
sudo mv vault.crt /etc/ssl/certs/ && sudo mv vault.key /etc/ssl/private/Create a new Vault configuration file:
sudo mkdir /etc/vault && sudo vim /etc/vault/config.hclAdd the following lines to the file:
storage "file" {
  path = "/var/lib/vault/data"
}

listener "tcp" {
  address = "0.0.0.0:8200"
  tls_cert_file = "/etc/ssl/certs/vault.crt"
  tls_key_file = "/etc/ssl/private/vault.key"
}
Export the service
Run the following:
echo '# Hashicorp Vault' >> ~/.bash_profile
echo 'export VAULT_ADDR="https://0.0.0.0:8200"' >> ~/.bash_profile
source ~/.bash_profile
Start the Vault service:
sudo systemctl enable vault
sudo systemctl start vault
Verify that Vault is running:
vault statusWhat's next?
What you do next depends on your use case and requirements. Here are a few common next steps:
- Initialize and unseal Vault: Before you can start using Vault, you need to initialize it and unseal it. This process generates the master key and root token, which you will use to access Vault's secrets.
- Configure secrets engine: Vault has multiple secrets engines that you can use to store and manage secrets. You can choose the secrets engine that best fits your use case and configure it.
- Store secrets: Once you have set up the secrets engine, you can start storing secrets in Vault. You can store secrets in Vault using the CLI, API, or UI.
- Set up authentication: To access Vault's secrets, you need to authenticate to the Vault server. Vault supports multiple authentication methods, including tokens, userpass, LDAP, and more.
- Monitor and manage Vault: Regularly monitor the Vault logs and the health of the Vault cluster. You should also regularly perform maintenance tasks, such as rotating the root token and backing up the Vault data.
Ok... now that we have the roadmap, let's go make some secrets! 🔥🤓
Initialize and Unseal the Vault server
This means setting up encryption keys and storage backend. If you need the full commands you can do vault server -help
Every initialized Vault server starts in the sealed state. From the configuration, Vault can access the physical storage, but it can't read any of it because it doesn't know how to decrypt it. The process of teaching Vault how to decrypt the data is known as unsealing the Vault.
Unsealing has to happen every time Vault starts. It can be done via the API and via the command line.
Here are the basic steps for initializing and unsealing the Vault server:
Initialize the Vault server:
If you get an error about the cert. not being trusted, then you did something wrong in the install step before this. Go back there.
vault operator init
Unseal the Vault server
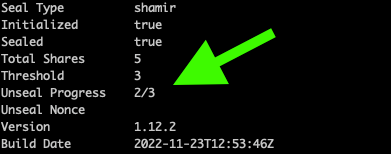
Unseal it using the encryption keys generated in the previous step (you will need at least 3 of the keys you generated above):
vault operator unseal <key_1>
vault operator unseal <key_2>
vault operator unseal <key_n>
You can see the status of all the unsealed keys and the total needed (threshold):
Verify that Vault is unsealed and ready to use:
vault statusThis command should return the status of the Vault server, including the sealed/unsealed status and the cluster name.
Configure a secrets engine
You can see all your defined secret engines with the following:
vault secrets listWhich secret engine to use? Let's discuss 3 types: Database Secrets Engine, the Cubbyhole Secrets Engine, and the AWS Secrets Engine, consider the following factors:
1. Access control and groups:
- Database Secrets Engine: Supports fine-grained access control, allowing you to manage permissions based on specific users, groups, or roles.
- Cubbyhole Secrets Engine: Only provides access to the individual token that was used to create the secrets, making it suitable for individual use.
- AWS Secrets Engine: Supports fine-grained access control, allowing you to manage permissions based on specific users, groups, or roles.
2. Key rotation:
- Database Secrets Engine: Supports key rotation, allowing you to rotate secrets periodically for increased security.
- Cubbyhole Secrets Engine: Does not support key rotation.
- AWS Secrets Engine: Supports key rotation, allowing you to rotate secrets periodically for increased security.
3. Integration with other services:
- Database Secrets Engine: Integrates with most databases, providing a centralized location for storing and managing secrets.
- Cubbyhole Secrets Engine: Does not have any integrations with external services.
- AWS Secrets Engine: Integrates with AWS services, providing a centralized location for storing and managing secrets.
In conclusion, the best option will depend on the specific use case and requirements. If you need fine-grained access control and key rotation, the Database Secrets Engine or AWS Secrets Engine may be the best option. If you need a simple solution for individual use, the Cubbyhole Secrets Engine may be a good choice.
Here's how to setup:
- AWS Secret engine
- Database Secrets Engine using Aurora Serverless v2 (to-do)
- Cubbyhole Secrets Engine (to-do)
If you know anyone who might need this, share it 🙌🏻
With love and respect,
Arturo 👨🏻💻
