Fastlane might be just another setup at first, however the use case and benefits after install are definitely worth the setup time.
Existing Fastlane setup
If you have already the project setup and just want to use it on another computer, follow the steps below:
- Make sure you have Ruby, Xcode installed.
- On the root folder of the project, run:
bundle install - Download the certificates:
bundle exec fastlane match
On step 3 you can run fastlane match development, fastlane match adhoc, fastlane match enterprise and fastlane match appstore. The default used above was development.
New Fastlane setup
This assumes you use the SPM or plain project, not cocoapods...
- Make sure you have Ruby & XCode installed
- Install Bundler (this is optional - it is used to have a fixed set of versions to use fastlane across the teams)
- Install Bundler by running
gem install bundler - Create a
./Gemfilein the root directory of your project by doingtouch ./Gemfilewith the content:
source "https://rubygems.org"

gem "fastlane"
Next, configure bundle so it updates the dependencies locally into your repo rather than gloably (don't commit the folder vendor):
bundle config set --local path 'vendor/bundle'
Make sure to commit the one that has the configuration for the above line, it'll be a file generated called config
Next, run bundle update and add both the ./Gemfile and the ./Gemfile.lock to version control
Every time you run fastlane, use bundle exec fastlane [lane]
3. Install Fastlane with brew
This way, you don't have to install Ruby separately, and instead homebrew installs the adequate Ruby version for fastlane.
brew install fastlane
Setting up Fastlane
Navigate your terminal to your project's directory and run
fastlane initFollow the prompts:
- What would you like to use fastlane for?
Select: 🚀 Automate App Store distribution - Would you like fastlane to manage your app's metadata? (y/n)
Selectn
That will automatically create for you the Appfile configuration and a sample fastlane command.
Install Certificates
Let's create a folder only for the certificates, this could be for development, distribution, etc...
- On the terminal, go to the root folder of your project, same lvl as fastlane folder.
- Type
bundle exec fastlane cert. This will ask you to login to your apple account and will ask you for a password to store it securely on your keychain (make sure you remember it)
This is going to create 3 files:
.cer- The certificate file, same as the one on the keychain (sharable with team).certSigningRequest- File that we use to sign out certificate with (not sharable with team).p12- The private key to sign the certificate
You can check your new certificate at Apple
Setup export to App Store Connect
I'll divide this in 3:
- Exporting the project locally into a ready to upload state with Gym
- Prepare app to export with Deliver
- Uploading to the App Store Connect
1. Exporting locally
On the root folder, run: fastlane gym init and on the newly created Gymfile add: output_directory("./build"). This will send all the builds to this folder instead of having them skadered on the root folder.
On your Fastlane file, add a new lane:
# Builds and packages iOS apps. It takes care of all the heavy lifting and generate a signed ipa or app file
  desc "Builds and packages app"
  lane :build_and_package do
    gym(
      project: "MyApp.xcodeproj",
      # Target you are exporting
      scheme: "MyApp",
      # Hide all information that's not necessary while building
      silent: false,
      # Clean the project before uploading it
      clean: true,
      # Uses Automatic manage signing - This is toggled on Xcode under Signing and capabilities.
      export_xcargs: "-allowProvisioningUpdates",
      output_name: "ReleaseApp.ipa"
    )
  end
Next: Open your XCode project and go to the target -> Edit scheme:
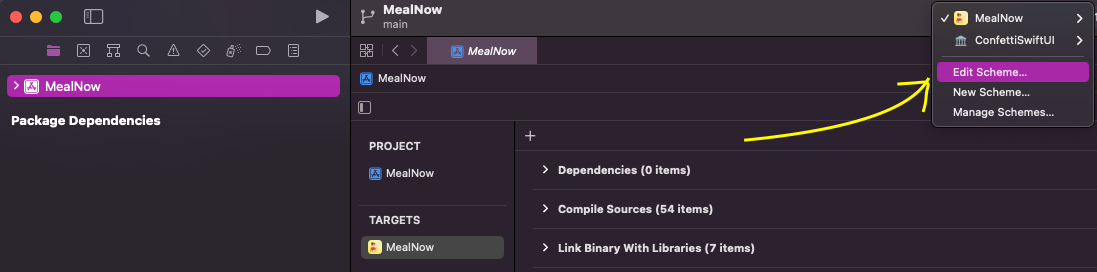
Make sure that "Shared" is toggled:
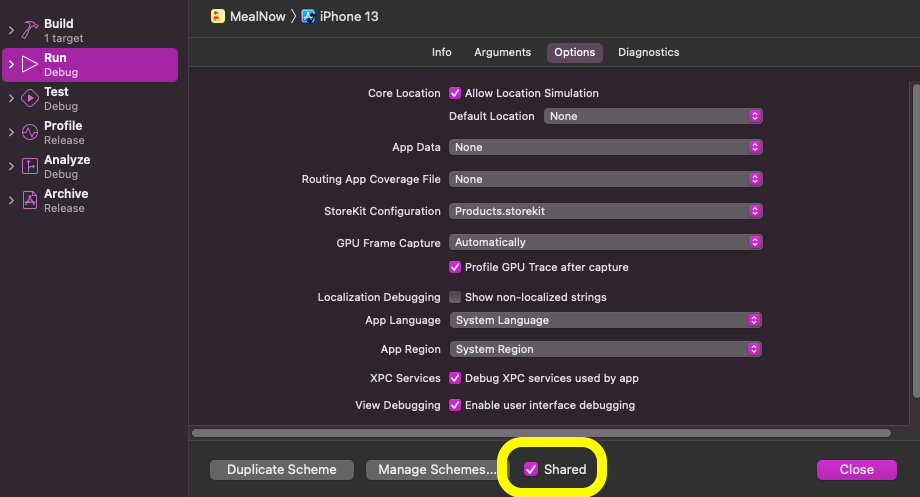
Now on the root folder of the project, test that it works: fastlane export. You should be getting when it's done a message like:
fastlane.tools finished successfully 🎉
To check the file was created, look at the root folder of the project -> build folder, you should see a file with the extension .ipa, in this example called: ReleaseApp.ipa
2. Prepare app to export
For this you need to provide Fastlane an authentication method to be able to access the App Store Connect, so go to your Apple id and tap on to create one.
Next go to the Appfile and create the environment variables:
# Apple App-Specific Passwords
ENV["FASTLANE_APPLE_APPLICATION_SPECIFIC_PASSWORD"] = "the_password_you_created_on_the_step_above"
# Your Apple email address
apple_id("[email protected]")
On the root project folder, run fastlane deliver init to create the initial setup.
On the file created Deliverfile , add your Apple id:
# Your Apple email address
username "[email protected]"
You don't need to upload the screenshots to git, the metadata is ok. In case you need to download both:
Screenshots:fastlane deliver download_screenshots
Metadata:fastlane deliver download_metadata
To get a list of available options run:fastlane action deliver
Next go to the Fastfile and create the following lane to make sure our app gets uploaded the way we want:
# Prepares to uploads screenshots, metadata and binaries to App Store Connect. Used to submit the app for App Store review.
desc "Prepare app to export to the App Store Connect"
lane :deliver_app do
  deliver(
    ipa: "ReleaseApp.ipa",
    submit_for_review: false,
    # deliver allows for metadata to be set through .txt files in the metadata folder. This metadata folder location is defaulted to ./fastlane/metadata but can be overridden through the metadata_path parameter.
    metadata_path: "./metadata",
    # Will use the local metadata for the release
    skip_metadata: false,
    # Create or update the app version that is being prepared for submission
    skip_app_version_update: false,
    # Should the app be automatically released once it's approved? (Can not be used together with auto_release_date)
    automatic_release: true,
    # Set to true to skip verification of HTML preview
    force: true
  )
end
3. Uploading to the App Store Connect
Now we can use the created 2 lanes above together in a flow to upload the app. Create a new lane:
# Complete flow to upload app to the App Store Connect
  desc "Upload to the App Store Connect"
  lane :upload do
    build_and_package
    deliver_app
  end
Now you can trigger a new binary upload with:
bundle exec fastlane uploadCheck metadata
By default when you run deliver it will check the metadata and warn you of any errors, but it's good from time to time to manually check, we'll create 2 more lanes:
- For singular apps to check
- To check all apps at once
desc "Check Metadata for all apps"
  lane :check do
    check_iOS_Metadata
  end

  desc "Check iOS metadata"
  lane :check_iOS_Metadata do
    precheck(
      # The bundle identifier of your app
      app_identifier: "com.arturofm",
      # Possible parameters: :error, :warn and :skip
      default_rule_level: :error
    )
  end
To run the lane: bundle exec fastlane check
You can also run a precheck without those conviniece lanes above with:
fastlane run precheck app_identifier:"com.arturofm"This is how the whole Fastfile looks:
# This file contains the fastlane.tools configuration
# You can find the documentation at https://docs.fastlane.tools
#
# For a list of all available actions, check out
#
#     https://docs.fastlane.tools/actions
#
# For a list of all available plugins, check out
#
#     https://docs.fastlane.tools/plugins/available-plugins
#

# Uncomment the line if you want fastlane to automatically update itself
update_fastlane
Skip generation of a README.md
skip_docs

default_platform(:ios)

platform :ios do
  # Builds and packages iOS apps. It takes care of all the heavy lifting and generate a signed ipa or app file
  desc "Builds and packages app"
  lane :build_and_package do
    gym(
      project: "MyApp.xcodeproj",
      # Target you are exporting
      scheme: "MyApp",
      # Hide all information that's not necessary while building
      silent: false,
      # Clean the project before uploading it
      clean: true,
      # Uses Automatic manage signing - This is toggled on Xcode under Signing and capabilities.
      export_xcargs: "-allowProvisioningUpdates",
      output_name: "MyAppiOSRelease.ipa"
    )
  end

  # Prepares to uploads screenshots, metadata and binaries to App Store Connect. Used to submit the app for App Store review.
  desc "Prepare iOS/iPadOS app to export to the App Store Connect"
  lane :deliver_app do
    # Spaceship::Tunes.login(ENV['FASTLANE_USERNAME'], ENV['FASTLANE_PASSWORD'])
    deliver(
      ipa: "./build/MyAppiOSRelease.ipa",
      # The bundle identifier of your app
      app_identifier: "com.arturofm",
      # Check for any Metadata error - By default deliver will call precheck and warn you of any problems if you want precheck to halt submitting to app review, you can pass precheck_default_rule_level: :error
      # Possible parameters: :error, :warn and :skip
      precheck_default_rule_level: :error,
      submit_for_review: false,
      # deliver allows for metadata to be set through .txt files in the metadata folder. This metadata folder location is defaulted to ./fastlane/metadata but can be overridden through the metadata_path parameter.
      metadata_path: "./metadata",
      # Upload the local metadata for the release - Useful to autocomplete release notes
      skip_metadata: false,
      # Upload your local screenshots - If you already have them, they will duplicate
      skip_screenshots: true,
      # Create or update the app version that is being prepared for submission
      skip_app_version_update: true,
      # Should the app be automatically released once it's approved? (Can not be used together with auto_release_date)
      automatic_release: true,
      # Set to true to skip verification of HTML preview
      force: true
    )
  end

  # Complete flow to upload app to the App Store Connect
  desc "Upload to the App Store Connect"
  lane :upload do
    build_and_package
    deliver_app
  end

  desc "Check Metadata for all apps"
  lane :check do
    check_iOS_Metadata
  end

  desc "Check iOS metadata"
  lane :check_iOS_Metadata do
    precheck(
      # The bundle identifier of your app
      app_identifier: "com.arturofm",
      # Possible parameters: :error, :warn and :skip
      default_rule_level: :error
    )
  end

end
Securing the certificates
It's extremely important that you don't leave your certificates unprotected. We'll be uploading them to a github repo that is private and fastlane has access to.
Setup
- Optional: Create a new, shared Apple Developer Portal account, something like
[email protected], that will be shared across your team from now on (for more information visit codesigning.guide) - Run the following in your project folder to start using match:
fastlane match initFollow the prompts where it'll ask you where to store your certificates...
You can now run fastlane match development, fastlane match adhoc, fastlane match enterprise and fastlane match appstore
On the first run for each environment fastlane will create the provisioning profiles and certificates for you. From then on, it will automatically import the existing profiles.
Also, you can write on the Matchfile the details of the apps and the dev id so you don't have to type it:
git_url("https://github.com/afern247/")
git_branch("master")
storage_mode("git")
# The default type, can be: appstore, adhoc, enterprise or development
type("development")
# Your Apple Developer Portal address
username("[email protected]")
app_identifier(["com.arturofm"])
# Include all matching certificates in the provisioning profile. Works only for the 'development' provisioning profile type
include_all_certificates(false)
Path in which to export certificates, key and profile
output_path("./certs")
# Renew the provisioning profiles every time you run match
force(false)
More to come:
Distribution to beta testing services
App Store Release
Possible errors:
A common fastlane warning is:
😵 Failed: Incorrect, or missing copyright date-> using a copyright date that is any different from this current year, or missing a date
I tried all github links about this and didn't find anything. Even though the copyright is fine, fastlane keeps giving a warning. If someone finds a solution, please let me know: [email protected]. But right now this is a false possitive.
wrong final block length Couldn't decrypt the repo, please make sure you enter the right password!
This one is because we need to encrypt the certificates when uploaded to Github, since there is no encryption, it will give an error. I didn't have time for this, will revisit in the future. BUT the certs are safe on Github and can be manually downloaded :)

If you know anyone who might need this, share it 🙌🏻
With love and respect,
Arturo 👨🏻💻
