
Motivation
We want to stop ads, trackers and malitious websites on our entire home network, and that includes Phones and tablets.
What is PiHole
Pi-Hole is a network-wide ad blocking app. It setups a DNS Server and handles all DNS requests generated from your home network. In simple terms, a DNS server is an internet address registry that helps locate the server using the domain name. When you visit any site, a query is made to the DNS server to locate the IP Address (location) of the server to connect to. Pi-Hole puts itself between your device and the DNS Server and blocks out any requests to known ad servers.
Here are some of Pi Hole’s awesome features/advantages:
- Free!!! All you need is a device to run Pi-Hole on – Raspberry Pi, Linux Machine, or Docker.
- No client-side ad block software required.
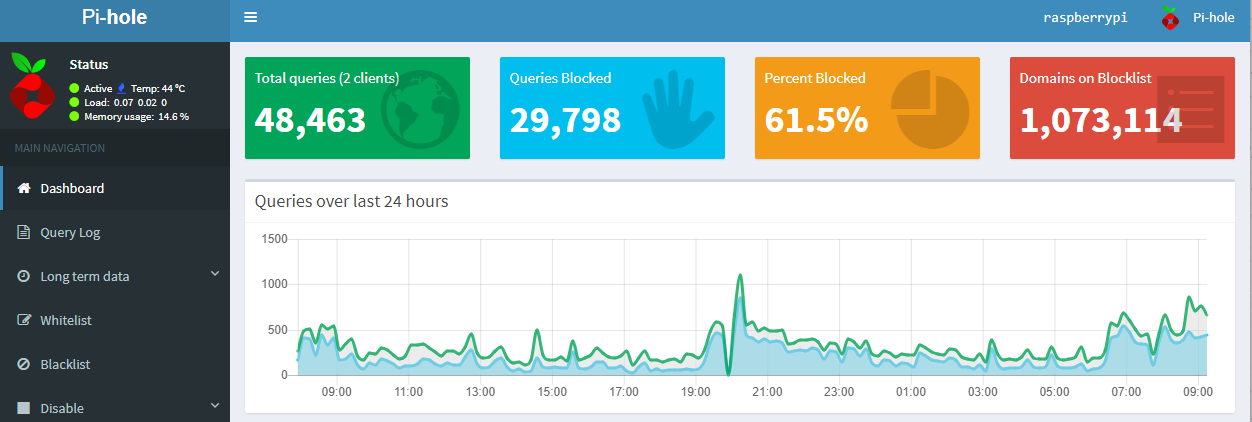
- Over 100,000 ad-serving domains blocked. You can expand this using server freely available user-created lists. My setup blocks over 1,000,000 domains.
- Blocks ads on any device, including those Smart TVs and other devices that do not allow you to make any modifications.
- Reduces bandwidth and improves overall network performance. As you can see from the above picture. Over 50% of the ad requests were blocked before they are downloaded.
- Provides an awesome dashboard to monitor various stats on ad blocking. Pi-Hole has a built-in web server that provides an easy to use Web UI for administration.
Pi Hole Setup Guide – Raspberry Pi
Setting up Pi Hole on Raspberry Pi is one of the easiest ways to get started on whole home adblocking. On a Raspberry Pi, Pi Hole will function as a self-contained unit. Therefore, no messing with web servers etc. on a Linux system. PiHole needs ports 53, 80, among others. So if you have other services running on the same system, there could be conflicts. So having a separate Raspberry Pi for this purpose is more efficient and hassle-free. Plus, it is only going to cost you $2 to $5 in electricity cost for the whole year to keep the Pi running 24/7. So let’s get started with Pi Hole setup guide for Raspberry Pi.
Step 1: Requirements
Here is what you will need to follow this Pi Hole tutorial successfully:
- Raspberry Pi 3B+ – Although any version of Raspberry Pi should work quite well for Pi Hole purposes.
- SD Card – I use Sandisk Ultra 16GB Micro SDHC UHS-I Card 98 MB/s.
- Power Adapter – This is already included in the kit listed above.
- Ethernet Cable – Although you can use Wifi, I strongly recommend a wired connection for reliability since all your network DNS requests will depend on this.
In addition, you will access to a keyboard and monitor to connect your Raspberry Pi temporarily for setup (or your can use SSH for remote setup) and may be 1 to 2 hours to complete the setup depending on your proficiency.
Step 2: Install Base OS – Raspbian Stretch Lite
Once you have Raspberry Pi and accessories, move on to setup the base operating system for Pi Hole.
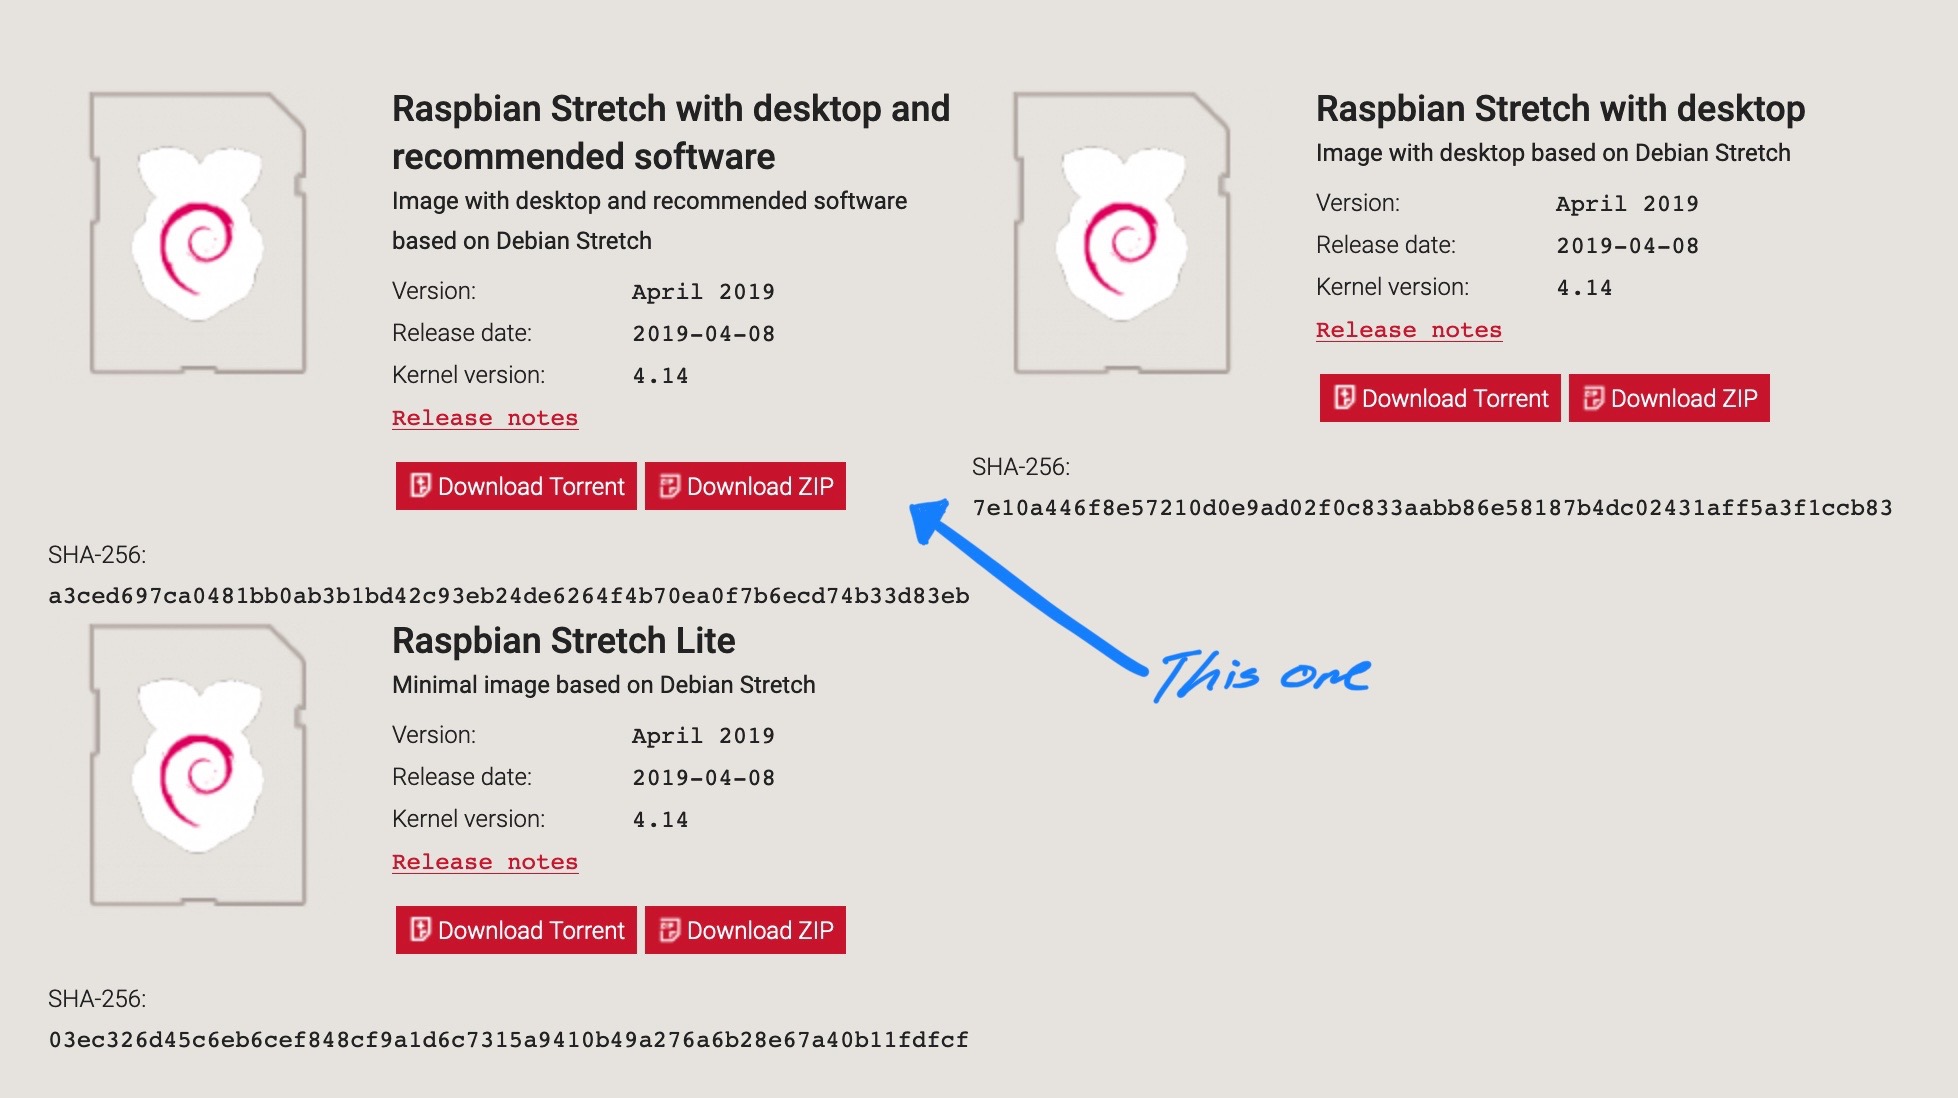
Head over to Raspbian download page and download the latest version of Raspbian Stretch with desktop and recommended software. Either method (ZIP or Torrent) will work.
Once downloaded, unzip it and use etcher to flash the image into the SDCard.
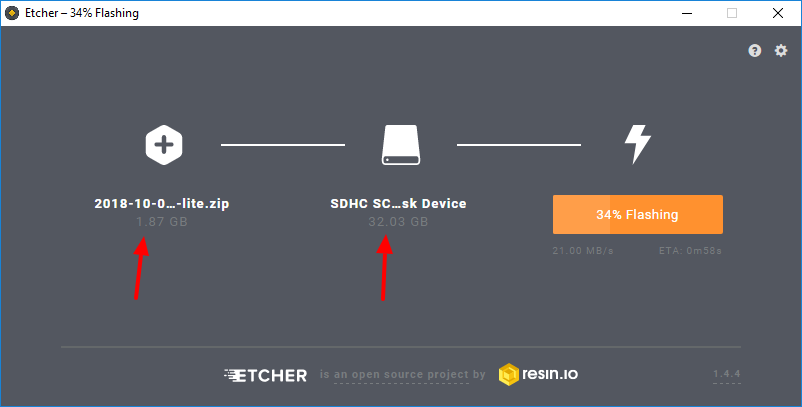
Note: Etcher will format your SD card while copying the Raspbian image.
Step 3: Configure Raspbian Lite OS
Enable SSH Access (optional but highly recommended)
I strongly suggest enabling SSH access as this allow you to remotely manage your PiHole server. For this, insert the SD card with the OS flashed already into your computer and create an empty file called ssh of your SD card.
On Windows: You can right-click and create a text file called ssh.txt (make sure Windows file extensions are turned on). Then, rename the file and delete the file extension.
On Linux and Mac: You can use touch ssh command to create the file.
Start Raspbian OS
To start Raspbian OS, insert/plug in:
- SD card into RPi
- Ethernet cable
- Mouse
- Keyboard
- HDMI connected to the TV
- Power up it up.
A welcome messgae will appear, write down the IP address on it and follow the instructions to set it up (remember to make sure it's connected to internet and you do the updates). The username is pi and password raspberry. Once setup, you will rarely have to mess with your Pi Hole setup again.
How to connect to your Pi Hole through SSH
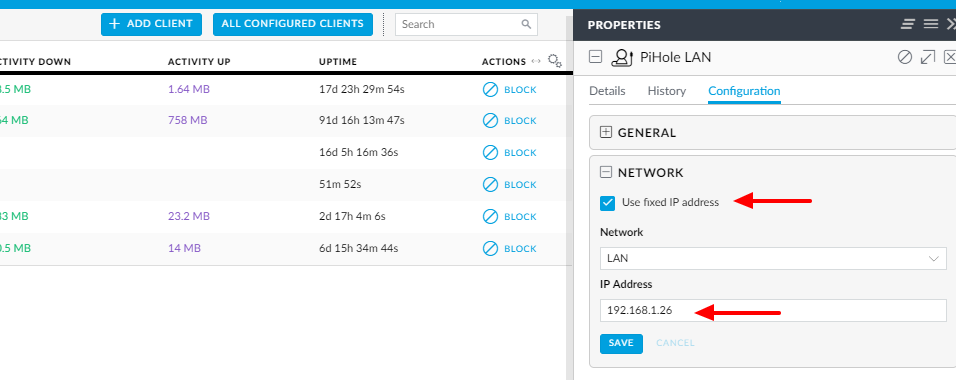
For this you will need your Raspberry Pi’s network IP address copied in the steps above. If you missed it, you can also login to your Wifi router administration page, look through your list of connected clients and note down the IP address of your Raspberry Pi. In my case, it is 192.168.1.26. While you are there, setup a static IP for your Pi Hole Raspberry Pi (this is required). Most modern routers rarely change the IP addresses of connected clients. However, when it does happen your Pi Hole instance will not be available and there is a good chance you may not have internet access as well.
Log into your router’s configuration page and find the DHCP/DNS settings. Note: make sure you adjust this setting under your LAN settings and not the WAN.
Connect to PiHole Through SSH
Once you have the PiHole’s IP address, use a SSH Client such as PuTTY for Windows or using the regular terminal in mac and connect to your Raspberry Pi through SSH using.
Example for Windows:
IP Address / Host, which in this PiHole guide is 192.168.1.26
Port 22
Example for mac:
Your username is: pi and our ip in this example is: 192.168.1.26 so to connect it would be:ssh [email protected]
then it will ask you for a password which should be the one you had setup at the begining of the welcome screen, remember? If you didn't set it up, then the default password is: raspberry
Change Default Password (if you haven't, above we did)
Raspbian’s default password, as stated above, is raspberry. For security, you must change this. One your logged into your Raspberry Pi command prompt (either through SSH or locally using monitor and keyboard), use the following command to set a new password:
passwd
That is it. You have now prepped your base OS for setting up Pi Hole.
Step 4: Pi Hole Installation
To setup Pi Hole, from the command prompt (locally or remotely through SSH) use the following commands in sequence:
wget -O basic-install.sh https://install.pi-hole.net
sudo bash basic-install.sh
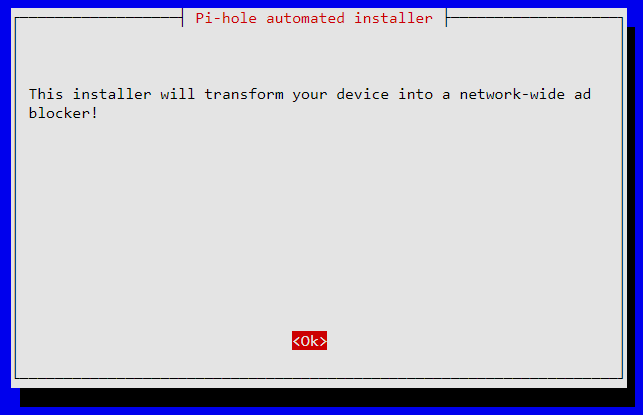
There is also one line installation code. Although PiHole is trustworthy, piping in bash is risky. So I recommend the above method. Then, follow the PiHole installer prompts as shown below. Read through the introduction and press Enter to continue.
As stated before, a static IP is needed for Pi Hole to function properly. We already took care of this before. PiHole has DHCP capabilities, which means it can act as your DHCP server and assign IP addresses to your clients. However, most routers can do this well as well. Therefore, we are going to let your router handle that and not use PiHole’s DHCP server. Only a static/fixed IP is needed to proceed further.
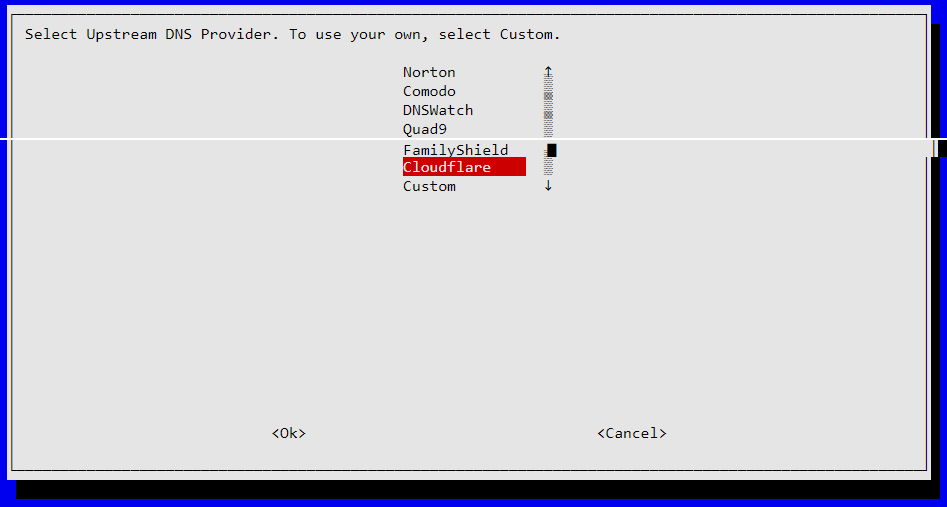
PiHole puts itself between your DNS server and clients. A DNS server is usually your ISP (many of them are notorius for hijacking searches etc.) although you may use other custom DNS servers such as Google’s public DNS. Recently, Cloudflare introduced their own privacy focussed DNS server. Unlike other DNS services that usually sell your DNS lookups data to ad companies, Cloudflare maintains no logs beyond 24h and does not sell your data. Therefore, we are going to use that one for our upstream DNS server. We will choose Cloudflare as shown below.
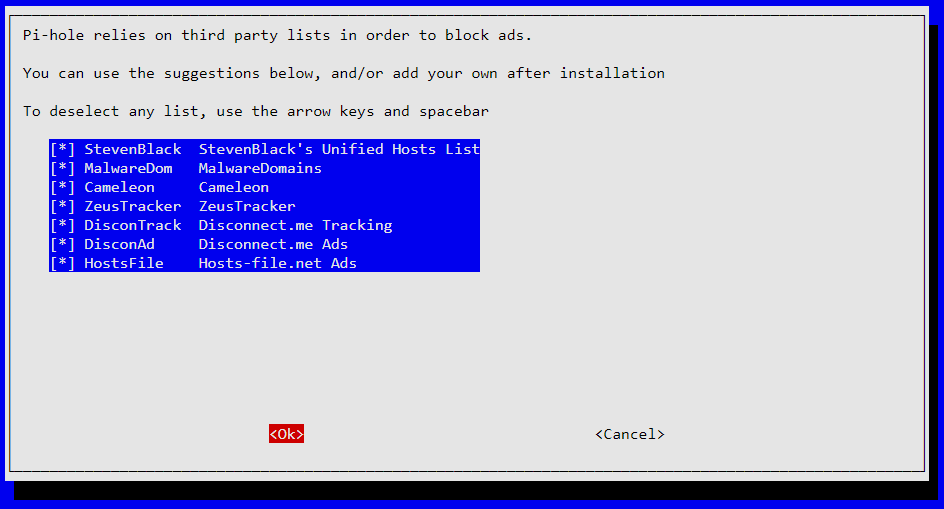
PiHole blocks ads using blocklists which contain known ad serving domain names. PiHole has no domains listed in blocklists, to begin with. So you won’t be blocking ads until you enable a few third-party blocklists. The installer offers you a list of suggested third-party blocklists. I suggest leaving the defaults enabled as shown below and continuing with PiHole installation. This will get you started with blocking over 100,000 ad/tracking domains.
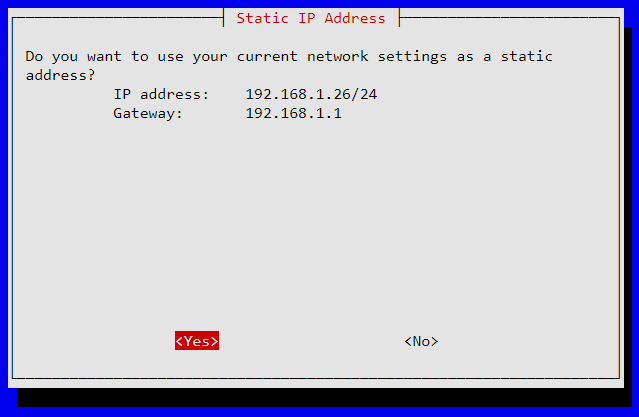
Finally, confirm the network and static IP details. Gateway IP shown here is the router’s IP address, which PiHole installer should pull automatically.
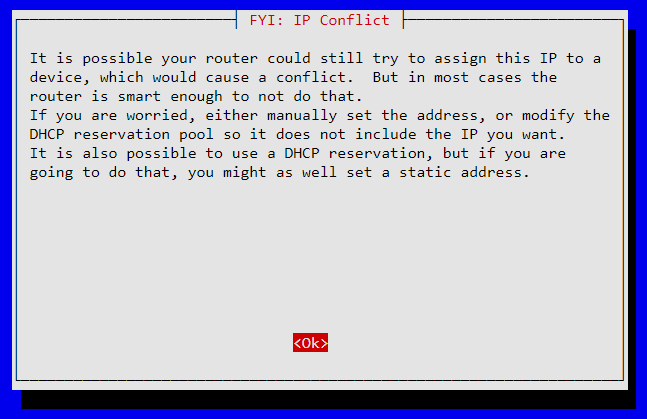
Next, you will see a warning on IP conflict in case Pi Hole receives the same IP address as another device on your network. With modern routers, this should be a rare occurrence.
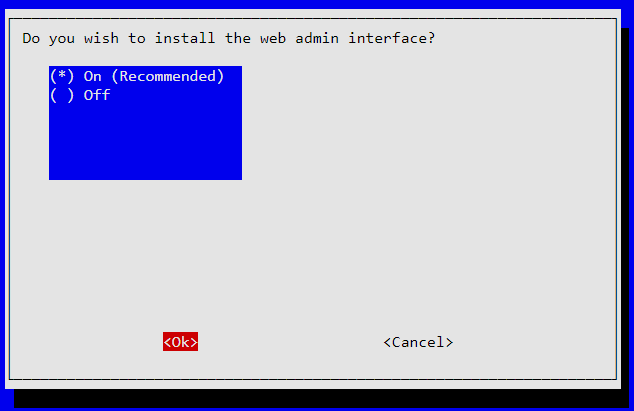
Then, you will an option to enable PiHole web interface, which I strongly recommend.
The final installer screen should show your password to use for the web interface. Note it down. If you forgot to note this down or would like to change the password, see the commands listed later in this guide.
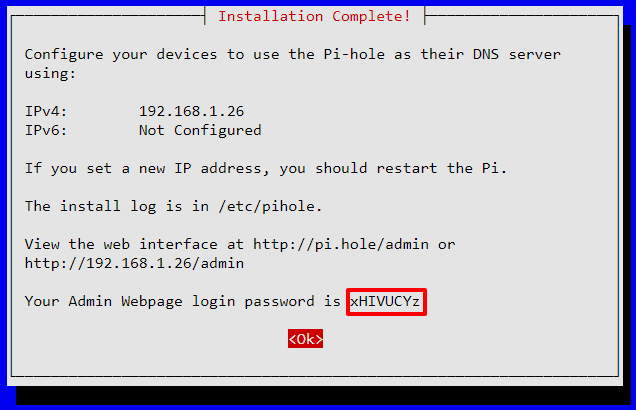
All steps to install PiHole are now done. Reboot it now: sudo reboot
Configuring Devices to Use PiHole (device specific)
If you don't want to manually configure each device, proceed to the next step (Whole Home Ad Blocking).
There is not a lot of configuring to do on Pi-Hole. You can actually start using it right away. But some basic PiHole configuration can make it even better. So let’s get on with it. In short, you will have to provide your Pi-Hole server’s IP address in place of DNS server IPs in your router/devices.
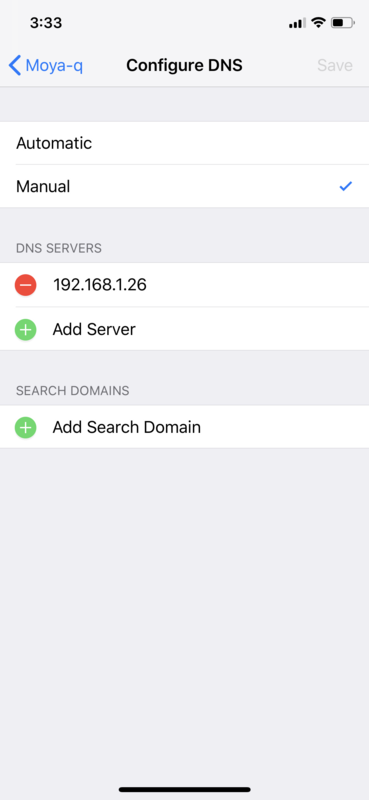
Note: Most devices provide options two list at least two DNS name servers. Unless you have two PiHole instances running at home, you will provide one DNS IP address and leave the other (rest) blank as shown below. If you specify a second DNS IP that is not a PiHole server, then ad block won’t work on some devices.
Iphone
Go to settings -> Wi-Fi -> Click the i on the right of your wifi network -> Configure DNS -> Put it in Manual and delete the ones you didn't add yourself, and then paste the IP of your Pi. Disconect from the wifi and connect again.
That's it, you are now removing the ads via DNS, on wifi.
Configuring Your Router – Whole Home Ad Blocking
To block ads on a network level, meaning all devices connected to your home network won’t see ads, you will have to manually change your DNS server IPs on your router. While many routers allow manually setting DNS servers, some do not make this advanced option available. Custom router firmware such as DD-WRT, OpenWRT, and Tomato, make open up this option among several others. So if you do not see an option to change DNS name servers, consider switching to one of the supported free alternate router firmware.
The advantage here is that there is only one place you will need to update your DNS server IP instead of each and every device. However, there are some disadvantages:
- Per-host tracking will be unavailable all requests to PiHole will appear as if they are coming from your router. My personal opinion is that this is not a big deal for a typical home user. I do not use it. But if you absolutely need this
- You will not be able to connect to devices with their hostnames as PiHole cannot resolve hostnames. Again, not a big deal for a typical home user in my opinion.
If the above two disavantages are deal breakers for you, then you partially overcome those by using PiHole Hosts file or fully by advertising PiHole’s IP address via dnsmasq in a router (if supported).
Note that if you chose this method, you will have to renew the DHCP leases provided by the router. The easiest way to do this is to restart the router.
Remember to include your Pi IP address IPv4 and IPv6, so when you connect with your phone, you should be able to see under DNS, in automatic that both IPv have been added (you can add it in your router)
VPN Setup
Motivation: Set up a Raspberry Pi as a VPN to your home network in order to increase security and privacy while browsing on public networks. Also block ads on mobile devices when you are not at home.
This is a tutorial for setting up OpenVPN on a Raspberry Pi, using PiVPN and a MacOSX, if you want me to include other OS let me know on the comments.
- Connect via SSH to your Raspberry Pi
- PiVPN Setup: Install it by typing on the terminal:
curl -L https://install.pivpn.io | bash - Walk through the prompts, choosing to automatically do security updates, the UDP protocol, the default port number (or something else if you wish), and at least 2048 encryption. The 2048 encryption bit will take a long time (up to 30 mins or more depending on your machine) so feel free to walk away and do something else in the meantime.
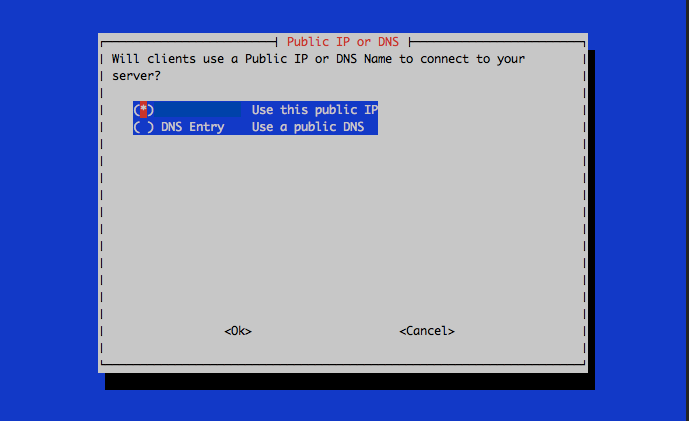
- When you get to to this screen, choose the IP if you have a static IP address you can use from your ISP. If not, sign up for No-IP and select the public DNS using the spacebar key. Enter the public hostname you created with No-IP.
- Your initial setup is complete, and it will ask to reboot. Reboot it now.
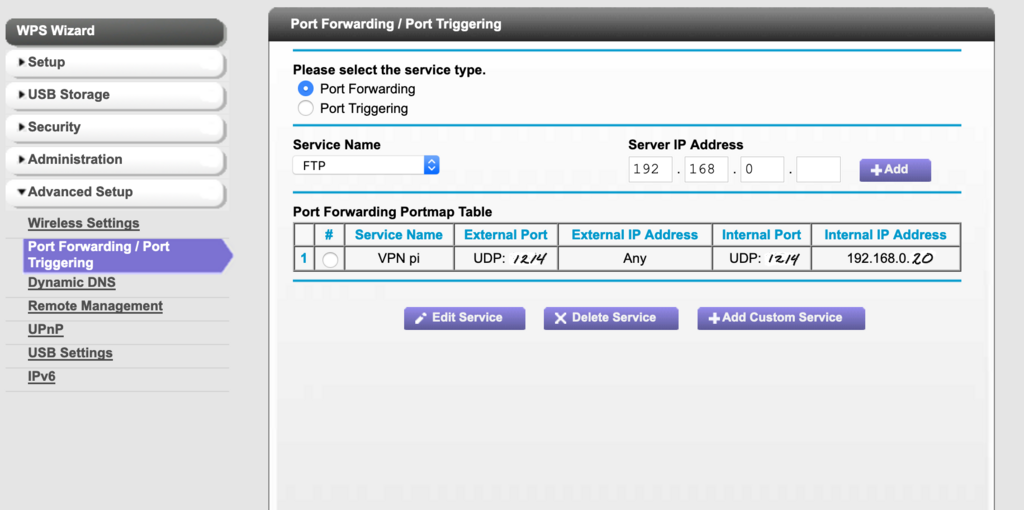
- Forward your Pi’s IP address on your router's port by adding port forwarding in your router’s configuration settings. This is an example:
- Create a client key by typing:
pivpn add. (One per device, so if a device ever gets stolen you can revoke access easily and still continue to use your VPN.) You can name the client whatever you’d like, but be sure the password is strong. This will create a .opvn file that you will need to transfer to the computer(s) that need VPN access. - Transfer the .opvn file from the
/home/pi/ovpnsdirectory of your Pi to your local computer(s). You can do this with Filezilla to transfer via SFTP to your computer. If you’re transferring to an iOS device (iPhone, iPad), download OpenVPN. You can use Airdrop to transfer the .opvn from your computer to your mobile device, then open it, select "share" and look for "Copy to OpenVPN" app select Add (don't put the password yet, after you add it you do that to avoid errors)
For macs, download and install Tunnelblick VPN Client for MacOSX. Then double-click the .opvn file, which will open Tunnelblick to install the VPN configuration.
You can see the device(s) connected to your pi by running this command: $ pivpn clients
Done with VPN setup!
Bonus Section!
The standard pi collection of hosts is great but it's not enough to block all those annoying ads that don't let you even play a video. So I'll attempt to create a compiled list to use the most of our pi, taking into consideration compatibility with websites so they don't break.
Where to find (sftp) your:
- Repo lists:
/etc/pihole/adlists.list - Whitelist sites:
/etc/pihole/whitelist.txt
It’s very important that whatever lists you decide to add to Pi-hole are in HOSTS format. As you’ll see below, things like Adblock Plus’ EasyLists can’t be automatically imported into Pi-hole.
- Guide on how to add lists
- If you are interested in adding additional domains to block, check out WaLLy3K’s blocklist compilation
Update/moving to new house or ip
If it stops working because the IP changed, you can follow some steps below. If you moved to a new house, follow all steps below.
Connect to the device
Since the pi is already setup with the software, just login through ssh. How?
1- Connect the LAN and power cable and on your mac type see on your network the ip address of your raspberry pi, and on the terminal do: ssh pi@ip-address
If you have no internet or cannot connect, plug in the I/O and monitor to the pi and connect it to the wifi.
On the SSH in mac, follow the steps:
- Update it:
sudo raspi-config - Reconfigure network (IFF your network and router changed)
pihole -r
Running out of space
Check how much space you have: df -hsudo apt clean
